Porcupine Grass Care: The Complete Growing Guide
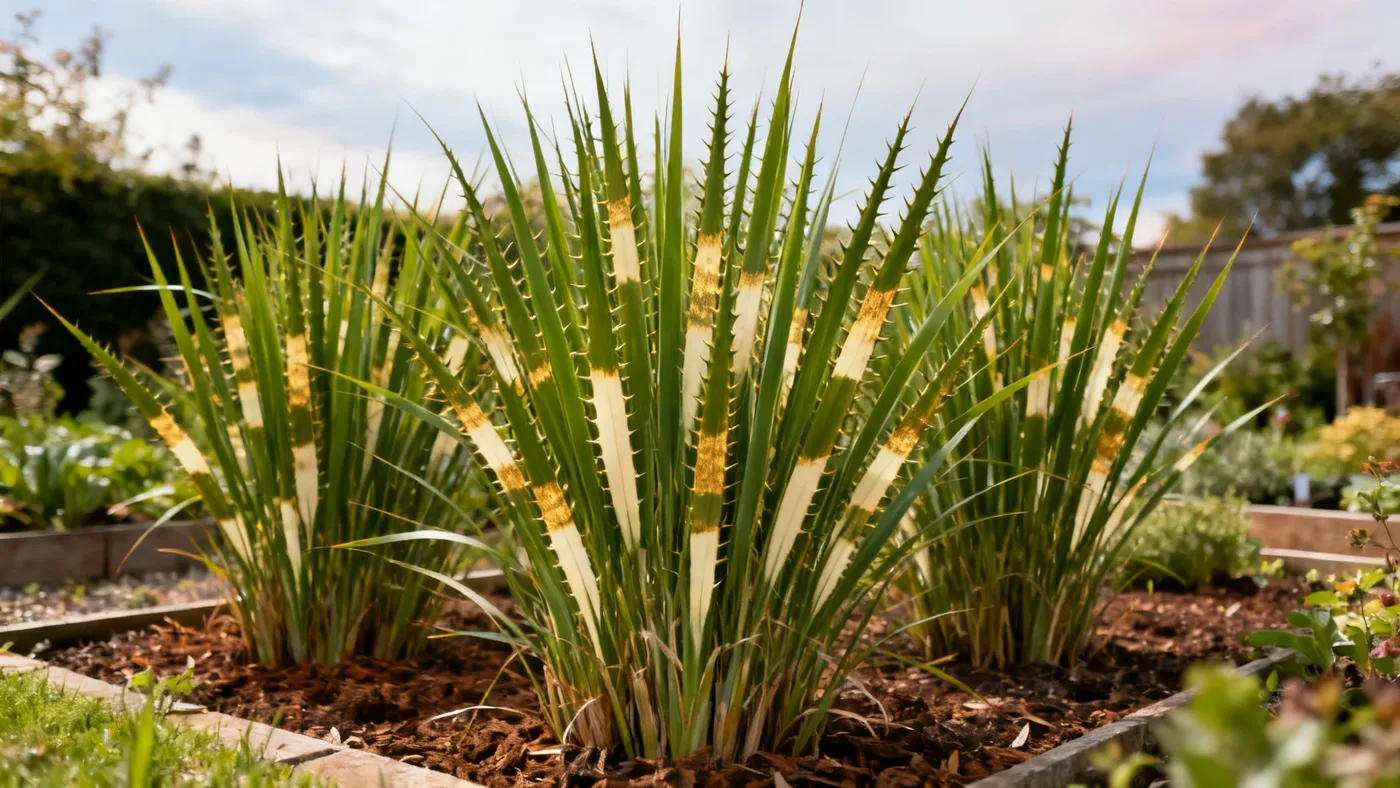
Porcupine Grass (Miscanthus sinensis 'Strictus') is a striking ornamental grass that brings vertical interest and year-round texture to any garden. Its stiff, upright foliage striped with horizontal gold-to-cream bands sets it apart from other ornamental grasses. Growing porcupine grass successfully requires understanding its preferences for sunlight, soil, and water, but once established, this perennial becomes a low-maintenance garden star.
What's Inside This Guide
- Growing Conditions and Site Selection
- Planting Porcupine Grass Step-by-Step
- Watering and Soil Care
- Fertilizing and Seasonal Feeding
- Pruning and Winter Care
- Troubleshooting Common Problems
- Landscape Design Ideas
- Quick Reference Checklist
Key Takeaways
- Porcupine Grass reaches 5-7 feet tall (including flower plumes) and spreads 3-4 feet wide at maturity
- Full sun delivers the best color and upright form; shade causes floppy stems and faded foliage bands
- Plant in spring after the last frost, or in early fall in zones 7 and warmer
- Cut back all foliage to 4-6 inches above ground in late winter or early spring; never prune in fall
- This grass tolerates most soils but prefers moist, well-drained conditions and average moisture
- Hardy in USDA zones 5 through 9
Growing Conditions and Site Selection
Success with caring for ornamental grass starts with choosing the right location. Porcupine Grass is a sun lover. Full sun (6 hours or more daily) produces the best color, flowering, and the stiff, upright habit you are choosing this grass for in the first place. In light or partial shade, the foliage bands become less distinct, and stems tend to flop or sprawl.
Porcupine Grass thrives in USDA zones 5 through 9. In cooler climates (zone 5), expect more modest heights around 4-5 feet, especially in shorter growing seasons. In warmer zones, you will see the full 5-7 foot range or even taller when flower plumes emerge in late summer through October.
Spacing and Layout
Space plants 3-4 feet apart if you are planting multiple clumps for a screen or hedge effect. This spacing allows for mature width and creates a fuller appearance over the growing season. If space is tight, a single specimen works beautifully as a focal point in a perennial border or near an entryway.
Soil Requirements
Soil type matters less with this ornamental grass than with many plants. Miscanthus strictus adapts to most soils, including clay. That said, it performs best in moist, well-drained soil with a pH between 5.5 and 7.5. Even if your garden soil leans heavy or compacted, this grass will establish and thrive with good cultural care.
Planting Porcupine Grass Step-by-Step
The best time to plant porcupine grass is spring, after your last frost date. This gives the root system the entire growing season to establish before winter dormancy. In milder regions (zone 7 and warmer), you can also plant in early fall to allow roots to settle before the cold months arrive.
Nursery-grown porcupine grass is commonly sold in quart containers or #1 and #3 pots. Larger container sizes establish faster, but even a quart-size plant will reach flowering size and a full, mature clump form in 2-3 growing seasons.
Planting Instructions
To plant, dig a hole roughly the same depth as your container and about twice as wide. Slide the grass from its pot and gently loosen the root ball before setting it in the hole. Backfill with your garden soil (no special amendments needed) and water in thoroughly. Firm the soil gently around the base.
Keep the newly planted grass consistently moist for the first few weeks. Once you see vigorous new growth, the root system is establishing and you can taper watering to normal patterns. Growth will be moderate to fast once the plant settles in, gaining roughly 1-2 feet of height per year until reaching full size in its second or third season.
Watering and Soil Care
Once established, porcupine grass is moderate in its water needs. The plant tolerates short dry spells but performs best with average, consistent moisture throughout the growing season. This means roughly 1 inch of water per week from rainfall or irrigation, depending on your local climate and soil drainage.
For the first year after planting, water more frequently to help the root system develop. Deep, thorough watering is better than frequent shallow watering. A soaker hose or drip irrigation works well, delivering water directly to the soil without wetting the foliage.
Using Mulch
Mulch is optional but helpful, especially in the first season. Apply 1-2 inches of wood mulch around the base, keeping it 2-3 inches away from the crown of the grass to prevent rot. Mulch moderates soil moisture and temperature while suppressing weeds.
Do not let porcupine grass stay waterlogged. Poor drainage invites crown rot and fungal diseases. If your soil drains poorly, consider building a raised bed or improving native soil with compost before planting.
Fertilizing and Seasonal Feeding
Porcupine Grass is a light feeder and does not need much fertilizer to thrive. In fact, overfertilizing causes floppy, weak growth that lacks the stiff, upright character this grass is prized for.
Apply a single balanced fertilizer (such as 10-10-10) in spring as new growth emerges. That single application is often all your grass needs for the entire season. If you have very poor or depleted soil, a second light application in early summer is acceptable, but resist the urge to feed again in late summer or fall. Late feeding promotes tender growth vulnerable to winter damage.
Established porcupine grass is largely self-sufficient after the first or second season. The root system will extract nutrients from your native soil and any organic matter you add over time.
Pruning and Winter Care
Winter is when porcupine grass earns its keep. The dried tan foliage and seed plumes provide excellent texture and movement through the coldest months, and the persistent plant parts offer shelter and nesting material for birds and small wildlife.
When to Cut Back
Do not prune in fall or early winter. Cutting back in autumn reduces winter interest, and fresh cut surfaces can invite crown rot during freeze-thaw cycles.
Instead, wait until late winter or early spring, just before new shoots emerge. Cut all foliage back to 4-6 inches above ground. Use sharp hedge shears or a string trimmer on a low setting. If your clump is very large, you can rake out the cut debris and compost it, or leave fine material on the soil as mulch.
Spring Growth
Spring cleanup is the only pruning most gardeners need. The grass regrows vigorously from the base, gaining 1-2 feet of height per year until reaching its full mature size of 5-7 feet (including flower plumes, which typically appear from August through October and mature from coppery-pink to silvery-white or tan).
Troubleshooting Common Problems
Flopping or Spreading Open
If your porcupine grass flops in the center or spreads open, the cause is usually one of three factors: overly rich soil, insufficient sunlight, or heavy rain right after a very wet spring. Overfertilized plants produce soft, weak growth that cannot hold an upright form. Move the plant to a sunnier spot, reduce fertilizer, and ensure drainage is good. A single balanced application in spring is plenty.
Faded or Subtle Foliage Bands
The striking horizontal gold-to-cream stripes fade in partial shade. Move the grass to a location with at least 6 hours of direct sun for the best color display. Even 4-5 hours of morning sun is better than dappled all-day shade.
Pests and Diseases
Porcupine Grass is generally healthy and resistant to most pests. Occasional aphids, mealybugs, or scale insects are rare and usually not serious enough to warrant treatment in a well-maintained plant. Rust or leaf spot diseases can develop in very humid conditions or crowded plantings with poor air circulation. Thin the planting if needed and avoid wetting foliage when irrigating.
Center Dieback After Several Years
Long-lived ornamental grasses like porcupine grass sometimes develop a dead zone in the center of the clump after 3-5 years. This is normal. Division is the solution. In early spring as new growth emerges, dig the clump, split it into 2-4 sections with a spade, and replant the healthy outer divisions. Discard the dead center. This rejuvenates the grass and can keep it vigorous for another decade or more.
Self-Seeding in Warm Regions
In warm, humid regions, particularly in the eastern, mid-Atlantic, and southeastern United States, porcupine grass (and its parent species) can self-seed into natural areas. Some states and municipalities restrict the sale or planting of Miscanthus sinensis because of this concern. Before purchasing, check with your local extension service or invasive plant list to confirm this cultivar is appropriate for your area. If you are near woodlands or waterways, deadheading spent flower plumes before seeds mature will prevent unwanted spread.
Landscape Design Ideas
Porcupine Grass shines as a specimen plant or structural accent in perennial borders. Its stiff, vertical form contrasts beautifully with softer mounding plants like coneflower, black-eyed Susan, and autumn joy sedum. The horizontal gold-and-green striping catches light and draws the eye, making it ideal for a focal point near an entry or seating area.
For a seasonal privacy screen, space porcupine grass 3-4 feet apart in a line. The clumps will knit together over 2-3 seasons into a tall, informal hedge that stands 5-7 feet high. The striped foliage and late-summer flower show (coppery-pink plumes maturing to silvery-white or tan) provide a dynamic, ever-changing backdrop from August through winter.
Container Growing
In large containers (at least 2-3 gallons for young plants, larger pots for mature specimens), porcupine grass works well on patios and decks. Container-grown plants need regular watering since pots dry faster than garden soil, but the grass adapts well and provides bold seasonal interest.
Companion Planting
Pair porcupine grass with asters, echinacea, sedum, and rudbeckia to extend your garden's color into autumn. While this grass is wind-pollinated and not a significant pollinator plant itself, the persistent seed heads feed birds through winter and the dense foliage offers shelter.
Quick Reference Checklist
| Task | When | Details |
|---|---|---|
| Plant | Spring after last frost or early fall (zones 7+) | Space 3-4 ft apart; full sun; moist, well-drained soil |
| Water | Consistently through growing season | Average, consistent moisture; 1 in. per week once established |
| Fertilize | Spring as new growth emerges | Single balanced (10-10-10) application; skip if soil is rich |
| Prune/cut back | Late winter or early spring | Cut all foliage to 4-6 in. above ground before new shoots emerge |
| Never prune | Fall or early winter | Reduces winter interest; can invite crown rot |
| Divide (if needed) | Early spring as new growth emerges | Rejuvenates clumps after 3-5 years; replant healthy outer divisions |
| Monitor | Summer and fall | Watch for flopping (increase sun, reduce fertilizer); thin for air flow if needed |